

If your website is built with WordPress, you have a huge target on your back, and that's why we will show you how to improve the security of your WordPress website.
Picture this - you've invested loads of time, money, and effort into building and developing your website, traffic has started to rise, and all of a sudden, you get slapped with a "Deceptive site ahead" message in your browser. Actually, in most cases we've seen, regular website visitors are the first to report such issues, and that's definitely bad for any business. You are not only losing money due to the downtime that you'd experience while fixing the damage, but your company's reputation takes a hit as well. And even if you are not running a super-important website, it's still not cool to have your account breached.

And you might be surprised how often WordPress-based websites get hacked. In most cases we see, the hacked application in question is WordPress, usually an outdated version. In fairness, we seem to stick to the latest industry trends showing that WordPress accounts for nearly 90% of all hacked CMS websites. Here are the exact numbers from Sucuri's official report for 2018:

You can find more information about Sucuri in the Sucuri Review by HostingPill.
Does WordPress Have Security Issues?
Don't get me wrong. These percentages don't mean that WordPress is more vulnerable compared to other CMSes. Every sufficiently large piece of software is bound to have security issues. This is just the nature of software development. These numbers are a direct reflection of just how popular each product is. WordPress has been the most dominant CMS by far over the last eight years, and that's why it accounts for nearly 90% of all hacks. And while for example OpenCart accounted for just 0.4% of hacked CMSes, that certainly does not mean it's the safest one.
The popularity of WordPress is the biggest factor here. Hackers like to go after widely used software applications for one very simple reason - it allows them to go after a large number of systems at the same time and thus increase the impact of their attacks. More targets means higher chances of success. Quite often, our Incident Response Team has to work on mass-hack cases where a vulnerability in a popular plugin or theme leads to hundreds of hacked customer websites.
Whenever we deal with mass-hacks, we first run a scan to identify all hacked and vulnerable (but not hacked yet) installations. After that, we password-protect the hacked ones to prevent further damage and we notify the owners of the bad news. Whenever possible, we try to protect the clean but vulnerable ones from serious and easily exploitable vulnerabilities in advance in order to reduce the likelihood of the sites getting hacked.
ICDSoft's Incident Response Team
The fact that there are thousands of plugins and themes for WordPress also works in favor of the hackers as it gives them as many attack vectors. In fact, these extensible parts of WordPress are its most vulnerable side. Many web developers are not well-versed in security, so they are very likely to make unintentional mistakes while writing code that end up being security vulnerabilities. Afterwards, they plug these security holes by releasing updates, and that's why it's crucial that you don't fall behind on updates.
So now that you are aware of the risks, let's find out how you can improve the security of your WordPress installation. Note that we will focus on using tools that are freely available in the ICDSoft Control Panel, so you won't have to spend any money or install additional plugins. These are all effective methods that are easy to implement.
1. Keep Your WordPress Installation Up-to-Date
You might have heard this a thousand times, but people still underestimate the importance of updating their software. According to Sucuri's report mentioned above, "a total of 36.7% of WordPress clean up requests had an outdated version."
The primary attack vectors continue to be the extensions of the CMS, such as the themes and plugins. Therefore, it's crucial that you not only update the version of your WordPress installation, but also all the different extensions that have been added, without any exception.
Some users are wary of updating as that could "break" their website. While the possibility certainly exists, with ICDSoft you don't need to keep your fingers crossed when pressing the "Update" button. If something goes wrong, you can always "undo" the update and restore your website back to a working state from one of our system backups. You can also opt to create a personal backup before you proceed with such tasks.
Don’t Worry - We got your back(up)
Our system makes automated daily backups of your entire account on a different machine, including files, databases, and email messages. For accounts on shared servers, the System Backups go seven days back, while System Backups on the VPS (First Class and Ultimate) and WebApps plans are kept for 15 days.
To sum up, it's important to update, and if you are hosted here, it's perfectly safe. And in the case of WordPress, it's really simple to apply updates. The easiest way to do it is via the Dashboard, but with the SSH access available on all ICDSoft hosting accounts, you can also apply updates through shell commands using WP-CLI.
1.1 Updating via the WordPress Dashboard
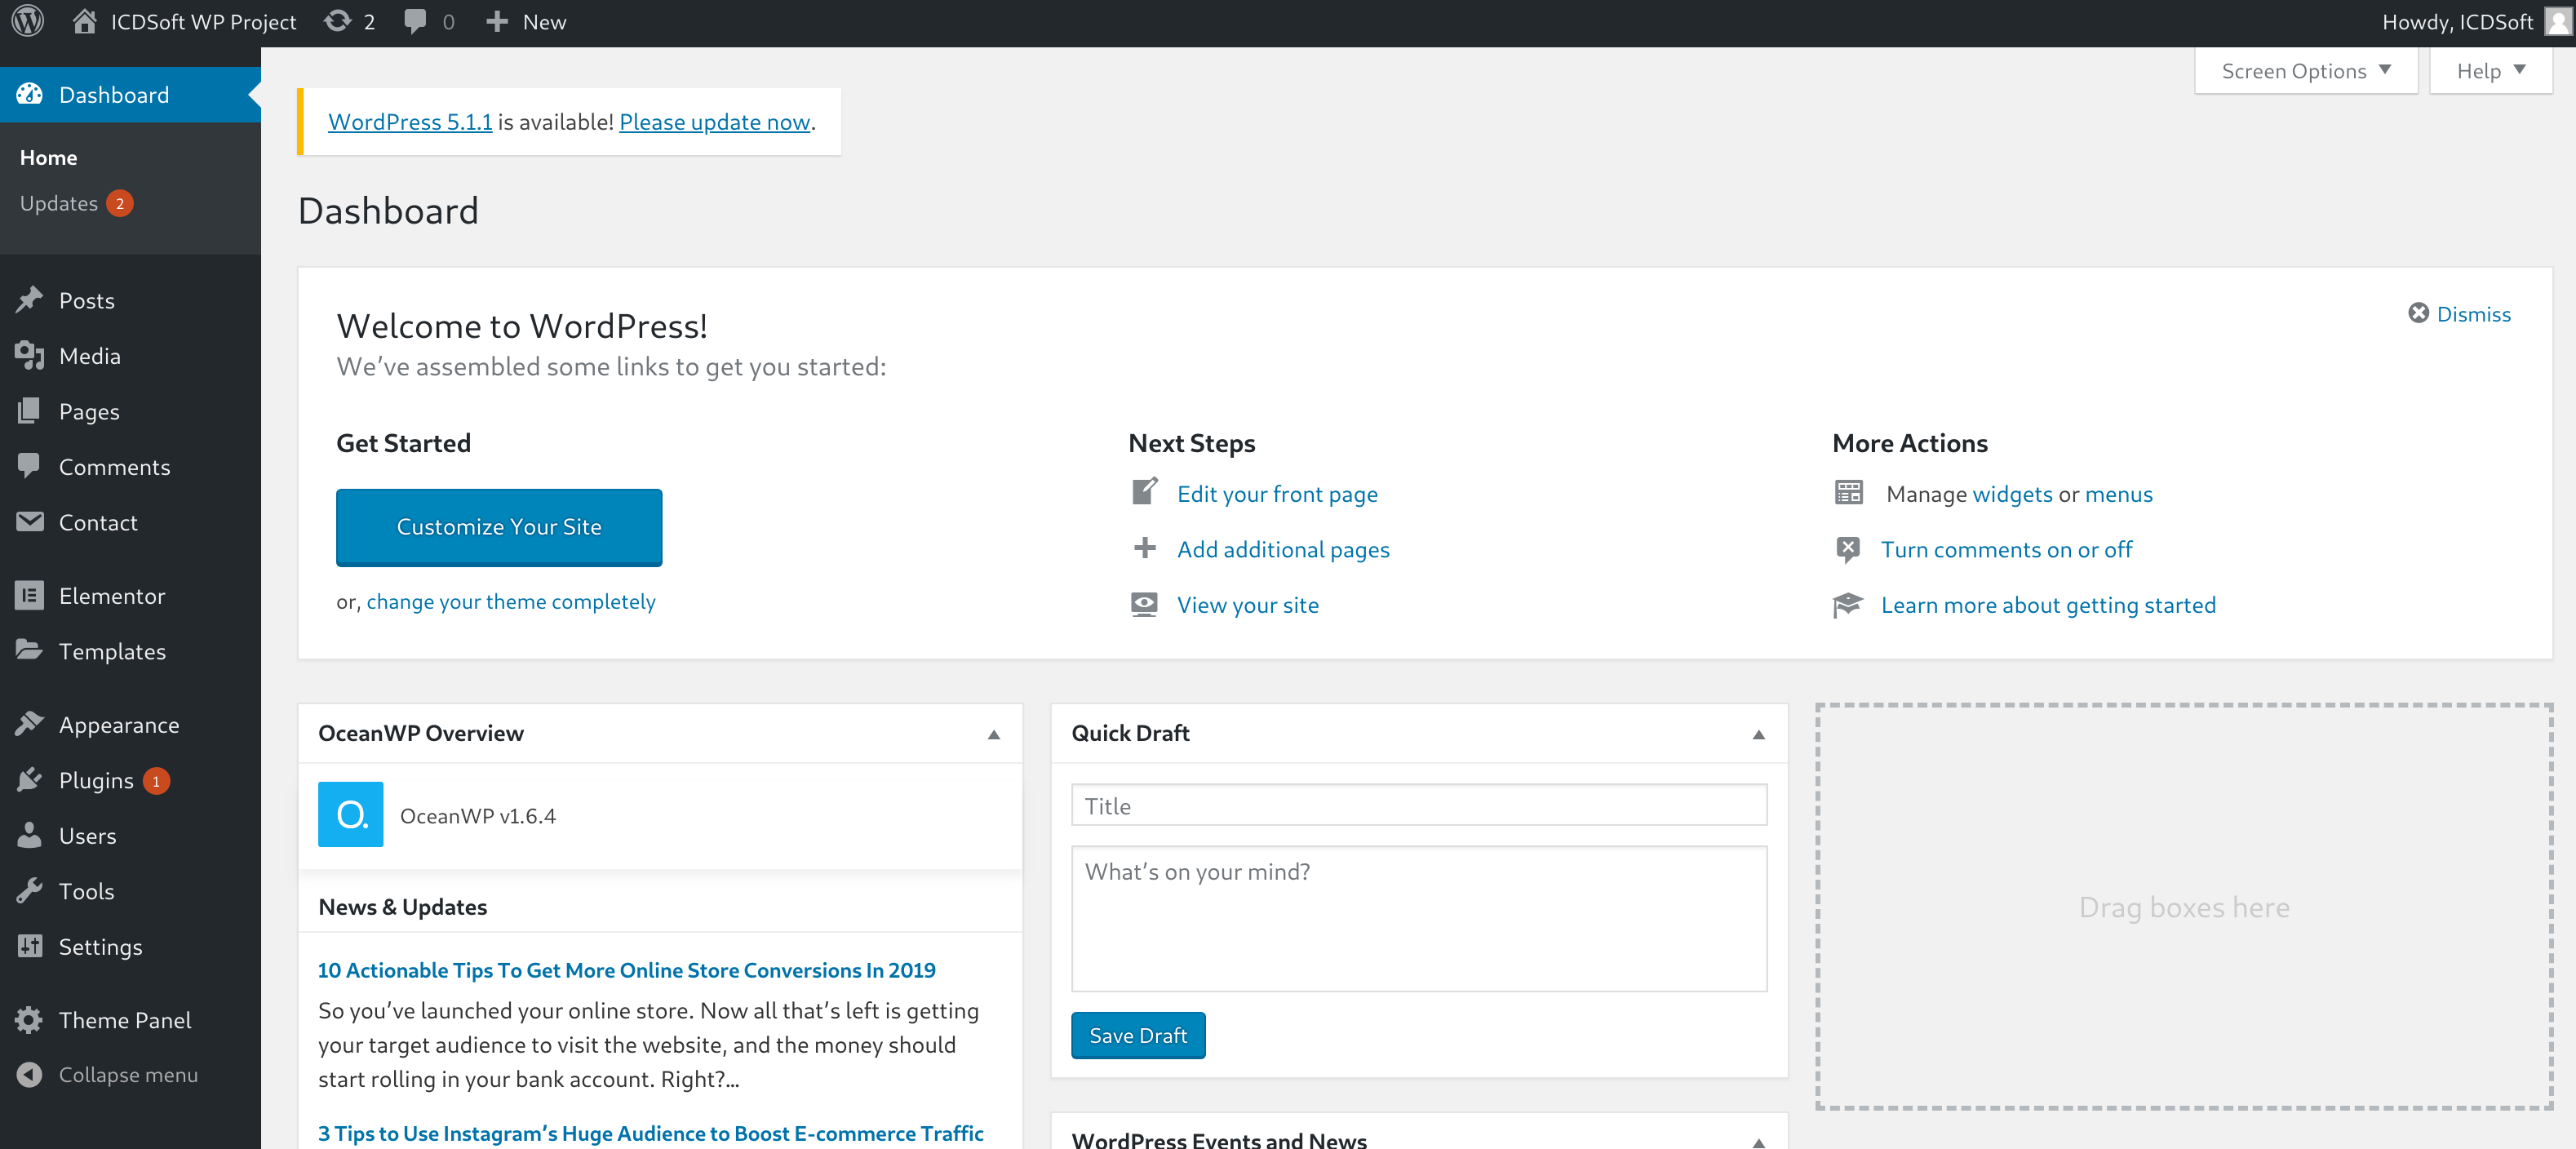
If there are pending updates for your core WordPress version or for one (or several) extensions, you will get a notification as soon as you log into your Dashboard. Typically, you should be able to access the Dashboard by appending /wp-admin to the URL where you have installed it, e.g. http://example.com/wp-admin.
You can check the video below for a summary of the process - there is an update available for our WordPress installation and one of the plugins (Elementor).
1.2 Updating with WP CLI

WP-CLI is the command line interface for WordPress, allowing you to manage all aspects of the application from the command prompt, without having to use a web browser. WP-CLI is available on all servers, but it requires SSH access.
You can enable it through the SSH Access section of the hosting Control Panel. Once logged into your account over SSH, you will need to navigate to the location of your WordPress site. Now, you are ready to run the WP-CLI commands below to perform WordPress update-related tasks:
wp core check-update - checks for available updates for the WordPress core
wp core update - updates the WordPress core
wp plugin list - shows a list of installed plugins, their current status (active/inactive), and whether an update is available
wp plugin update plugin-name - updates the specified plugin
wp theme list - shows a list of installed themes, their current status (active/inactive), and whether an update is available
wp theme update theme-name - updates the specified theme.
2. Password-protect the WordPress Dashboard
According to a report from Panda Security, 81% of all hacks are based on insecure or stolen login credentials. Our experience with hacked WordPress installations shows a lot of cases where the attacker was able to directly log into the Dashboard with administrator credentials. The login credentials (of a user with admin role) are usually obtained through a virus running on the user's compromised computer, but there are a number of other possibilities. For example, the credentials could have been sniffed while accessing the Dashboard over a public WiFi, or they could have been obtained via brute-force attack. Bottom line is that once logged in, hackers typically proceed to install a malicious script as a plugin, or inject malicious code directly using WordPress' build-in theme or plugin editors.
A very effective way to guard your WordPress installation against such unauthorized access to the administrative panel is to add a second layer of protection to it. That way, even if the bad guys have your WordPress credentials, they won't be able to access the Dashboard as that second layer would stand in their way. In addition, it keeps you safe from brute-force attacks.
To set it up, you just need to password-protect the application's wp-login.php script. Our Control Panel allows you to do it in just a few simple steps:
1) Log into the hosting account Control Panel -> Protection -> Web Access Protection section.
2) Navigate to the folder where WordPress is installed. The interface should list the subfolders (wp-admin, wp-content, etc.) as well as the wp-login.php file.
3) Use the Plain or Digest buttons next to the wp-login.php file, and add a user for it.
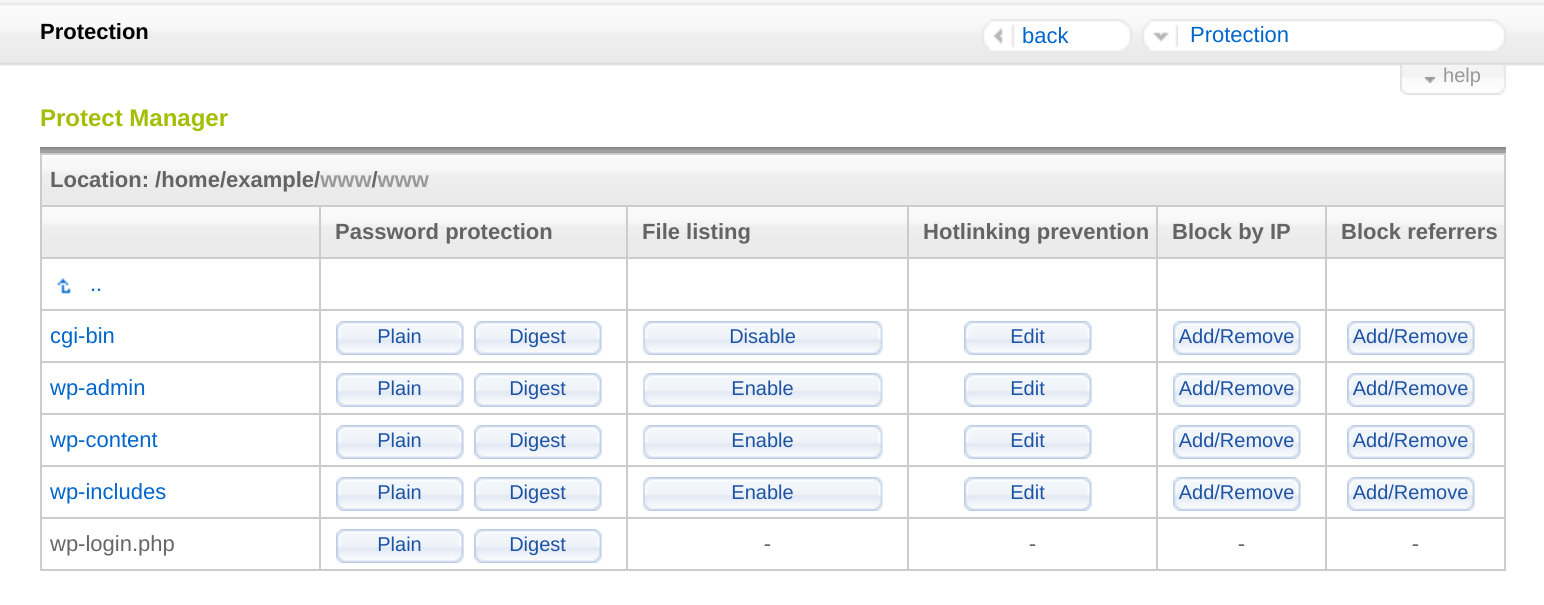
We would recommend using the Digest method. This way, the credentials will be transmitted by the browser encrypted. The Plain method will have the browser submit the credentials unencrypted. This method can be used when the site is accessed over HTTPS.
Note that if you password-protect the wp-login.php script, all users who have registered on your website and need to log in would have to enter the credentials for that extra layer of protection. Otherwise, they would not be able to reach the WordPress admin login page at all. This could be tricky for WordPress installations with many users. In such cases, you can just give all the registered users the same username and password for the password protection. Although they will have the same credentials for the additional protection layer, they will still keep their own separate login credentials for the actual WP Dashboard.
3. Install an SSL Certificate on Your WordPress Website
We have an extensive blog post on what SSL certificates are and how they work. Basically, an SSL certificate encrypts the communication between the computer of your website visitor and the server. Now, you may wonder, just how exactly is this related to your overall WordPress security? The aforementioned blog post on SSL certificates shows how easy it is to sniff network traffic when a plain HTTP connection is used. If you access your Dashboard login page via HTTP, an attacker that's on the same WiFi network as you can capture your login credentials using a tool like Wireshark.
If you install an SSL certificate on your website and force HTTPS connections, these login credentials would no longer be transmitted in plain text. They would be encrypted. That's how an SSL certificate improves your WP security.
You can order a commercial SSL certificate from our website at https://www.icdsoft.com/en/ssl, or through the Reseller Panel. We will install it on the server for you without any intervention required on your side. You will just have to approve the order via email.
Alternatively, you can use a free SSL certificate from Let's Encrypt. Let's Encrypt certificates adhere to the same security standards and provide the same level of encryption. You can install a Let's Encrypt certificate from the Control Panel -> SSL/HTTP -> Let's Encrypt certificates -> select the subdomain in question (e.g. "www.example.com / example.com") -> Enable.
Once you have an SSL certificate installed, you can force HTTPS connections to your website from the SSL/HTTPS section in the Control Panel. Unless you have customized the appearance of your WordPress login form, this should be enough to ensure a fully secured HTTPS connection to it. However, your website might start throwing mixed-content errors. We have a FAQ article covering that topic, but you could also ask our support team to apply the necessary changes for you.
4. Limit Your Hosting Account's FTP Service

The FTP service is another common entry point for hackers. Quite often, we would see security incidents where a malicious script is uploaded to the web root folder (/www/www) over FTP and later accessed over HTTP to upload additional back doors and other malware.
The most effective defense against this particular threat is to limit your account's FTP service only to your IP(s) or disable it completely. This is easily done from the Control Panel -> Protection -> FTP access protection. The interface will automatically pick up your current IP address and prefill it under the allowed IP address/network section, so you can quickly add it.
5. Improve the Security of Core WordPress Files/Folders
This part focuses on several security improvements to the core WordPress infrastructure. Note that they come with some "side effects" that you need to be wary of, because they could break your website. That's why we strongly recommend that you test your site after applying each change to make sure everything works as expected. In case something goes wrong, you can easily revert the change.
5.1 Disable Execution of PHP Scripts in the /wp-content/ and /wp-includes/ Directories
This technique reduces the impact of a successful attack by disabling the execution PHP scripts inside the /wp-content/ and /wp-includes/ directories of WordPress. Typically, when hackers gain access to a website, they proceed to upload malicious files, and they often go to one of these folders or subfolders.
You can apply this particular WordPress security improvement directly through the Control Panel. There, you should access the WordPress Manager -> List WordPress Installations -> Manage -> Secure content directories -> Apply. In case your WordPress installation is not listed there, you should go back to the Scan for WordPress installations menu, and Import it manually.
This tool will add the following code to the .htaccess file under the /wp-content/ and /wp-includes/ directories:
### BEGIN PHP Security rules enabled via Control Panel > WordPress ###
Options -Indexes
# Execution prevention
<Files ~ "\.ph(?:p[345]?|t|tml)$">
   deny from all
</Files>
#### END PHP Security rules enabled via Control Panel > WordPress ####
5.2 Disable Access to Scripts In /wp-includes/

We will add a code to your WordPress' .htaccess file that disables the direct access to scripts in the wp-includes folder. Adding that code should not cause any issues with your website, because scripts in that folder are not meant to be accessed directly by users in the first place.
Here is the code you should add to the .htaccess file under the folder where WordPress is installed (you should have that file by default):
# Block the include-only files.
<IfModule mod_rewrite.c>
RewriteEngine On
RewriteBase /
RewriteRule ^wp-admin/includes/ - [F,L]
RewriteRule !^wp-includes/ - [S=3]
RewriteRule ^wp-includes/[^/]+\.php$ - [F,L]
RewriteRule ^wp-includes/js/tinymce/langs/.+\.php - [F,L]
RewriteRule ^wp-includes/theme-compat/ - [F,L]
</IfModule>
You can add the code using the File Manager in the Control Panel. Make sure to add it outside the # BEGIN WordPress and # END WordPress tags. Otherwise, it could get overwritten. If you are using a WordPress Multisite installation, you should remove the line RewriteRule ^wp-includes/[^/]+\.php$ - [F,L] as it prevents the execution of ms-files.php, which generates images.
5.3 Disable File Editing
As noted, hackers often use the WordPress Dashboard to upload malicious plugins or inject code in existing plugins or themes. That's why it's a good idea to completely disable the file editing via the Dashboard. You can do this by adding the following lines in the wp-config.php file using the File Manager:
## Disable Editing in Dashboard
define('DISALLOW_FILE_EDIT', true);
These lines should be added in the middle of the file along with the other defines. Note that once added, you will no longer see the Theme Editor under the Appearance menu of the Dashboard.


 – Improved Email Forwarding")
