Changing the Site URL
You can use the WordPress Manager section of the hosting Control Panel to change the Site URL of a WordPress installation by following the steps below:
1. Open the Manage tab.
2. Find the WordPress installation in the list, and click on the Manage button for it. This will take you to the management page for the WordPress installation.
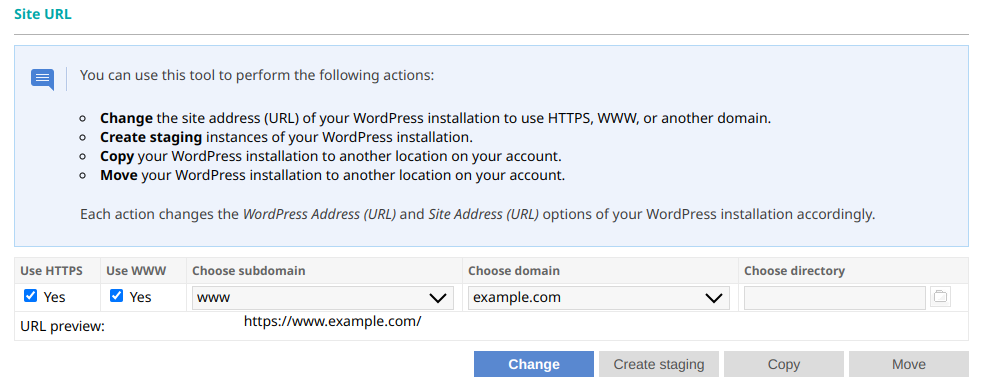
3. Select the Site URL using the controls under the Site URL section. A preview of the URL is shown below the controls. The controls are as follows:
- Use HTTPS: Set the site to use HTTPS instead of HTTP. This is only possible if there is a valid SSL certificate installed for the host.
- Use WWW: This option gives you the ability to prefix www. to the website address of your WordPress installation. This option is available only for the www subdomain.
- Choose subdomain: You can choose from a list of the subdomains created through the hosting Control Panel > Subdomains section.
- Choose domain: Choose the domain from the list of domains associated with the account.
- Choose directory: Choose a directory in the selected subdomain. If you wish to have the WordPress installation within the root of the domain/subdomain, you should leave it blank. If you choose a directory that is different from the current one, you are effectively moving WordPress to that directory. Details about that can be found in our Moving WordPress between directories or subdomains on the hosting account article.

4. Click on the Change button.
When you change the address of WordPress, the tool performs the following actions:
- Creates a temporary backup of the WordPress installation.
- Changes the Site URL (WordPress Address) setting.
- Changes the Home (Site Address) setting.
- Searches and replaces the current address with the new address in the database.
Note: If there are any hard-coded links of the website's URL in the WordPress files, you will need to update them manually.