Installing CMS Made Simple [version 2.2.8+]
You need to follow these steps to install CMS Made Simple (CMSMS):
1. Download the installation files archive (expanded version) and its checksum file from the official vendor site. CMS Made Simple can be obtained from:
http://www.cmsmadesimple.org/
2. Once you have downloaded the archive that contains the installation, you need to upload it to your hosting account. You do not need to upload the checksum file.
You can either extract all the files from the downloaded archive and upload them, or you can upload the archive and use the web hosting Control Panel's File Manager to extract the package.
The best way to upload big files or multiple files is via FTP. If you are not sure how to upload the files, please check the Uploading files section from our online documentation.
If you are installing the application in your main domain, or in a subdomain, you may need to delete the default index.php file first. You can do this either via FTP or through your web hosting Control Panel's File Manager.
3. Create a new MySQL database and user for the CMSMS application. For security reasons, MySQL databases and users can be created only through the hosting Control Panel. Detailed instructions on the process are available in our Creating a MySQL database/user article.
Once you have the database and MySQL user created, you should associate the MySQL user with the database by following the instructions from our Associating a MySQL user with a database article. Unless you have a reason to do otherwise, you can select all available privileges for the new MySQL user.
4. By default, the time zone for CMSMS will be set to the server's time zone. If you wish to change it, please refer to our Changing the server timezone in PHP scripts article.
You should also enable output buffering via a PHP configuration file (php.ini) in your hosting account. Example values you can add a php.ini file are:
output_buffering = on
output_buffering = 4096
You can learn more on how to change various PHP settings in our Changing PHP Settings article.
5. To start the installation wizard, open in your browser the URL where the extracted CMS Made Simple files are located and click the installation .php script. On the first page of the installation, choose your preferred language for the interface. Click "Next".
6. CMSMS checks for an existing previous installation in the chosen directory. If none is found, the software allows you to continue. Click "Install".
7. On this step CMSMS checks if the server meets the installation requirements. Click the "Next" button.
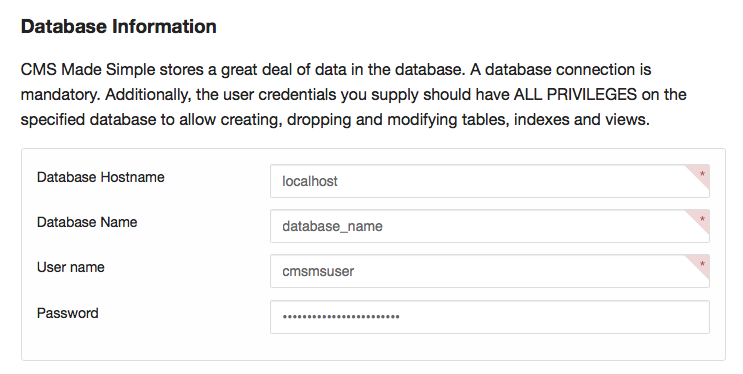
8. In the "Database Information" section enter the following:
Database Hostname: localhost (for MySQL 5) or 127.0.0.1:3308 (for MySQL 8)
Database Name: You need to specify the MySQL database you created for your CMSMS application. <
User name: You need to enter the MySQL username you created at your web hosting Control Panel's MySQL section for your CMSMS application.
Password: You need to enter the password you assigned to your MySQL user. 
Select your time zone under the Server Timezone section.

Click "Next" to proceed.
9. At the "Admin Account Information" screen provide credentials for the initial administrator account. This account will have access to all the functionality of the CMSMS Admin console.
After filling out the form click on "Next".
10. At this step you have to enter the name for your website (Web Site Name). You can choose any name you wish, like something related to your site content, the name of your company or your domain. On this screen you can also select additional languages to install. Click "Next" to proceed.
11. Click "Next" to extract files from archive and create dummy index.html files.
12. The database will be >populated. Click "Next" when the installer reports the performed tasks.
13. You are ready! – CMSMS was successfully installed.
Warning: For security reasons it is important that you remove the installation assistant from your browsable website as soon as you have verified that the operation has succeeded.
Important: You should monitor the site of the software vendor for any security updates of your installed application.