Installing Drupal [version 8.6.3+]
NOTE: You can install Drupal on your account with a few clicks via the App Installer section of the Control Panel.
If you prefer to install Drupal manually, you can follow the instructions listed in this article.
You need to follow these steps to install Drupal:
1. Download the installation from the site of the vendor. Drupal can be obtained from:
2. Once you have downloaded the archive that contains the installation, you need to upload it into your disk space.
You can either extract all the files from the downloaded archive and upload them, or you can upload the archive and use the web hosting Control Panel's File Manager to extract the package.
The best way to upload big files or multiple files is via FTP. If you are not sure how to upload the files, please check the Uploading files section from our online documentation.
If you are installing the application in your main domain, or in a subdomain, you may need to delete the default index.php file first. You can do this either via FTP or through your web hosting Control Panel's File Manager.
3. Create a new MySQL database and user for the Drupal application. For security reasons, MySQL databases and users can be created only through the hosting Control Panel. Detailed instructions on the process are available in our Creating a MySQL database/user article.
Once you have the database and MySQL user created, you should associate the MySQL user with the database by following the instructions from our Associating a MySQL user with a database article. Unless you have a reason to do otherwise, you can select all available privileges for the new MySQL user.
4. By default, the time zone for Drupal will be set to the server's time zone. If you wish to change it, please refer to our Changing the server timezone in PHP scripts article.
5. You need to access with your browser the directory in which the extracted Drupal files are located. You should see the web page of the Drupal installation. You need to select the installation language. Click the "Save and continue" button.
6. On this step select the installation profile. You can leave the default "Standard" option selected. Click the "Save and continue" button.
7. Drupal will verify the installation requirements. We would recommend that you choose the FPM with OPcache handler for PHP when installing Drupal. You can do that through the PHP Settings section of the hosting Control Panel.
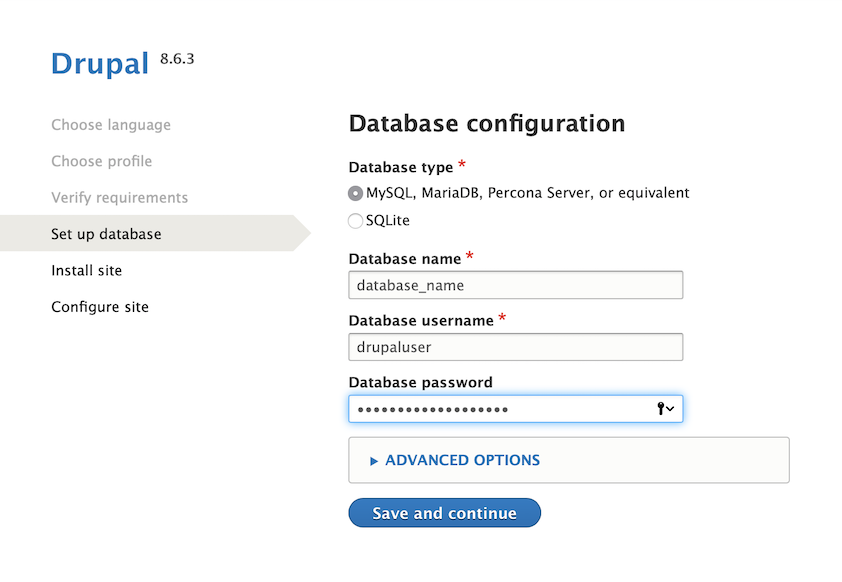
8. You need to specify the following settings:
Database type: MySQL
Database name: You need to enter the name of the MySQL database you created for your Drupal application.
Database username: You need to enter the MySQL username you created at your web hosting Control Panel's MySQL section for your Drupal application.
Database password: You need to enter the password you assigned to your MySQL user.
If you use a MySQL 8 database, click on "Advanced options", and enter the following settings:
Server: 127.0.0.1
Port number: 3308
When you are ready, click the "Save and continue" button.
9. On the next step you need to specify the name of your site under Site name and its e-mail address under Site e-mail address. This should be a name of your choice, which would be related to the content of your site, to your company name or to your domain name for example.
Create the Site Maintenance account by entering a Username and an E-mail address for managing Drupal. Enter a password of your choice under Password and Confirm password, through which you would administer your Drupal application.
Choose a Default country and a Default time zone for your Drupal site. We strongly suggest you to mark the Check for updates automatically option in order to be notified when new releases of Drupal are available.
When you are ready, click the "Save and continue" button.
Important notice: You should also monitor the site of the software vendor for any security updates of your installed application.