Installing WordPress
WordPress is arguably the most popular website-building solution. It is free and is suitable for almost any kind of website - from a blog and gallery to an e-commerce store. It uses PHP and MySQL as server-side technologies, and its installation/maintenance is quite easy.
In this tutorial we will show you how to install WordPress using the WordPress Manager in the hosting Control Panel. For instructions on installing WordPress manually, check our Installing WordPress Manually article.
Requirements
To install WordPress on your hosting account, you need:
- At least 80 MB of free disk space.
- One MySQL database. The database will be created by the automatic installation script.
Installation
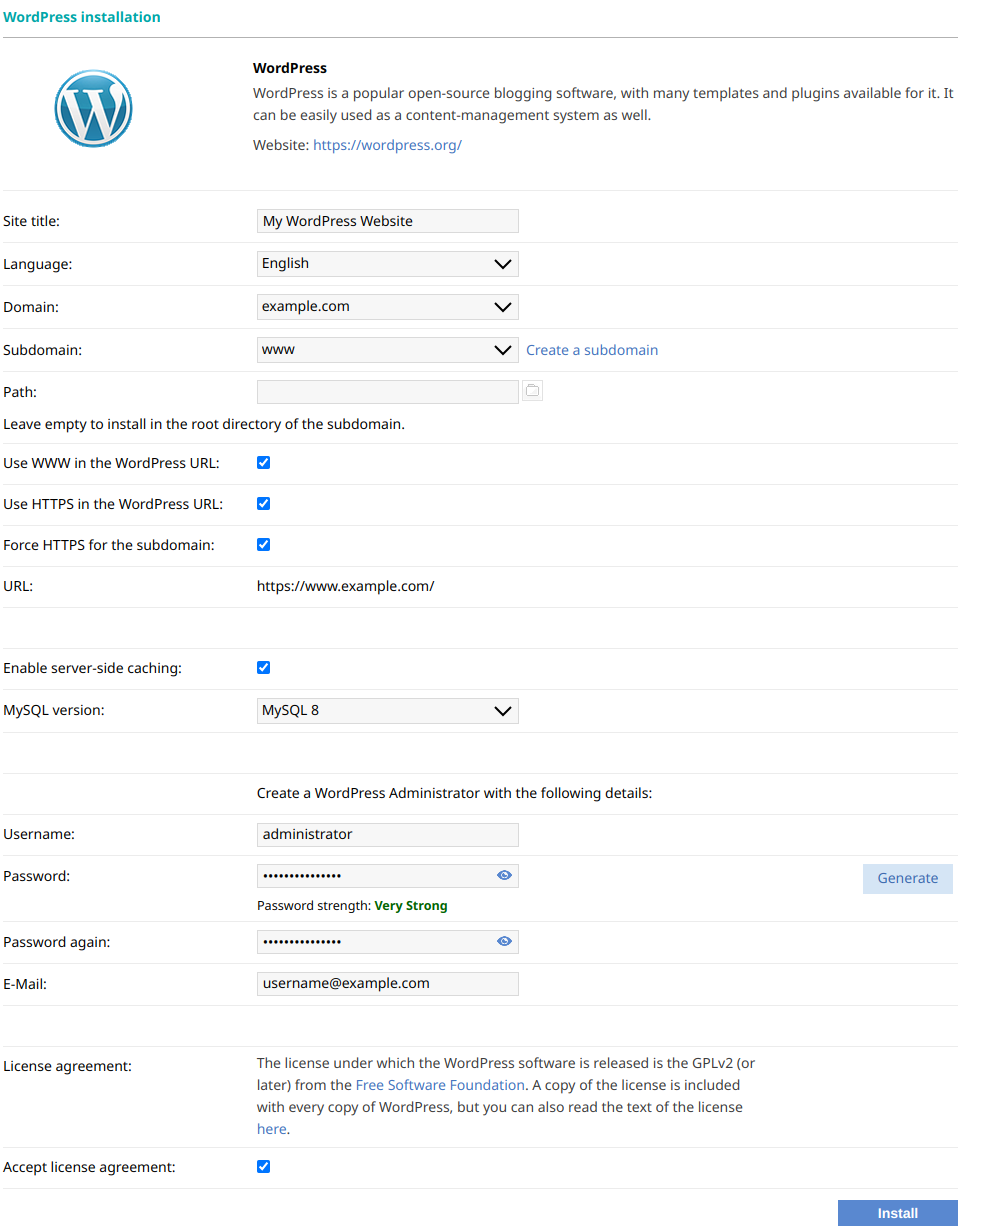
To install WordPress, navigate to the WordPress Manager > Install tab of your hosting Control Panel. You will need to fill in or select the following options:
- Site Title: You need to enter the name of your WordPress site. You choose this name. For example, it can be related to the content of the website, the name of your company, your domain name, etc.
- Language: Select the language for your site and its administrative area - the WordPress Dashboard. Note that the sample content the site comes with is always in English.
- Domain: Select a domain for the website from the domains associated with the account. Note that WordPress is a domain-dependent application, so the domain you choose here will be used for all links to pages, posts, etc.
- Subdomain: Choose the subdomain where you want WordPress installed. To have WordPress as the main website for the domain, choose the www subdomain. If you want to install WordPress in a new subdomain, click on the Create a subdomain link, which will take you to the Subdomains section of the Control Panel.
- Path: If you wish to install WordPress in the main folder of the subdomain you have chosen, you can leave this field empty. If you wish to install in a subfolder, please click the
 (Folder) icon and choose an installation folder.
| We advise that you install WordPress in a folder that does not contain other files and folders as they can be overwritten by the installation script. |
- Use WWW in the WordPress URL: Choose whether to prefix the address with www (e.g. http://www.example.com).
- Use HTTPS in the WordPress URL: Choose whether to set the site to use HTTPS instead of HTTP. This is only possible if there is a valid SSL certificate installed for the host.
- Force HTTPS for the subdomain: Select whether to force SSL/HTTPS connections for the subdomain you selected above. You can enable/disable this option at any time via the SSL/HTTPS > Force HTTPS section.
- Enable server-side caching: Choose whether to enable server-side caching for improved site loading times. It can also be enabled after the installation. For more details, check our Enabling server-side caching for WordPress article.
- MySQL version: Select the MySQL version that you would like to use for WordPress - MySQL 5 or MySQL 8.
- Username: Enter the username that you want to use for administering your site. You will be able to create additional WordPress users later through the WordPress Dashboard.
- Password: Enter a password for the above username. Make sure you set a complex and unique password.
- Password Again: Enter the password again.
- Е-Mail: Enter the email address of the main user for administration. You will need this email for example to retrieve the password of your WordPress main administrative user (in case it is lost).
- Accept license agreement: You need to check the license of WordPress and accept it.

After you configure all options, click on the Install button. If the folder you are installing in contains files/folders, you will see a warning. If you want to choose another subdomain or subfolder for the installation, you need to click on the Cancel button. Otherwise, you can click on the Continue button.
Note that the results of some operations are cached, so you may not see your changes immediately. If that happens, please allow a few minutes for the cache to expire.
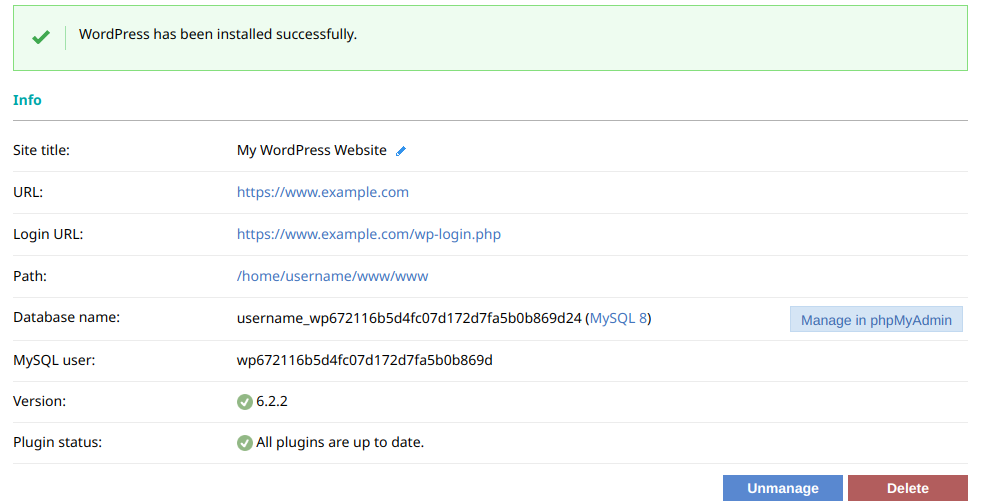
If the WordPress installation completes successfully, you will see a screen with the installation details:
| We strongly advise that you keep your WordPress installation up to date, along with the plugins you add. You can perform the updates through the administrative section of WordPress or the hosting Control Panel > WordPress Manager, where you will see notices that new versions of the WordPress core and/or plugins are available. |
Most operations made in the WordPress Manager of the Control Panel are performed using the WP-CLI tool. These operations are logged in the ~/.wp-cli/history.log file in your hosting account.