Running a Redis Instance
Redis is an in-memory data storage which supports different data structures like lists, strings, and associative arrays. It can improve the performance of websites that use databases by caching the queried data directly in the server memory using the key-value model. Since it offers faster access times for frequently accessed data, Redis can significantly reduce the load time of your scripts or website. More information about Redis is available in its official documentation.
Important: If you do not have a WebApps section in the Control Panel of your account, then this tutorial is not suitable for your particular hosting environment. You can get in touch with us if you need further assistance.
This tutorial will show you how to install and use Redis from within a web application in a few simple steps:
- Installing Redis via SSH and the sureapp CLI tool or the hosting Control Panel.
- Enable Redis support for the PHP version of your website.
- Activate object caching with Redis for your scripts or website
After you install Redis, you will be able to access it via the /home/example/private/redis/redis.sock socket on your website or scripts. You should replace example with the username of your hosting account.
Check if Redis is already available
Redis is available by default for some hosting plans. You can check if it is available for your account by running the following command via SSH:
redis-cli ping && echo "Redis is available!"
If Redis is available by default for your account, a message "Redis is available!" will be displayed, which means that Redis works at localhost (with IP address 127.0.0.1) on the default Redis port (6379).
Install Redis in a web application via SSH
You can install Redis on your account in a web application by following these steps:
- Connect to your account via SSH.
- Create a directory (/home/$USER/private/redis) and a configuration file (/home/$USER/private/redis/redis.conf) for Redis. You can do this with the following code block:
sureapp_project="redis"
redis_dir="/home/$USER/private/redis"
mkdir -pv "$redis_dir"
cat <<REDIS_CONF > $redis_dir/redis.conf
unixsocket $redis_dir/redis.sock
unixsocketperm 700
port 0
daemonize no
stop-writes-on-bgsave-error no
rdbcompression yes
maxmemory 64M
# how redis will evict old objects - least recently used
maxmemory-policy allkeys-lru
REDIS_CONF - Create a web application for Redis:
sureapp project create \
--engine "custom" \
--engine-version "-" \
--release-dir "$redis_dir" \
--start-cmd "/usr/bin/redis-server $redis_dir/redis.conf" \
"$sureapp_project" - Enable the web application:
sureapp service manage --enable "$sureapp_project"
You can test if Redis was activated correctly and is working with the following command:
redis-cli -s "$redis_dir/redis.sock" ping
The output of the command should be "PONG", which indicates that Redis is working correctly.
Install Redis in a web application via the hosting Control Panel > WebApps section
You can install Redis in a web application using the hosting Control Panel > WebApps section by following these steps:
- Go to your hosting Control Panel > File Manager.
- Enter to the Private directory (Private files) and create a new directory for your web application (e.g. /home/example/private/redis, making sure you replace example with the username of your hosting account).
- Access the new directory and create a file name redis.conf with the following content:
unixsocket /home/example/private/redis/redis.sock
unixsocketperm 700
port 0
daemonize no
stop-writes-on-bgsave-error no
rdbcompression yes
maxmemory 64M
# how redis will evict old objects - least recently used
maxmemory-policy allkeys-lru
Note: Replace example with the username of your hosting account and /private/redis/ with the directory you created for Redis. - Go to the WebApps section of the hosting Control Panel.
- Use the following settings in the form for creating new web applications:
Engine - Select Custom.
Name - Enter a name for your web application (e.g. redis).
Domain - Select a domain of your choice from the drop-down menu.
Subdomain - Select a subdomain of your choice from the drop-down menu.
Web access path - Enter a directory/path that does not exist (e.g. /does-not/exist/redis). If there is a file or a directory with the same name, they may stop working.
Deployment directory - Choose a directory for the Redis web application (e.g. /private/redis).
Start command - Enter "/usr/bin/redis-server /home/example/private/redis/redis.conf" and make sure that you replace example with the username of your hosting account and /private/redis/ with the directory you chose for the Redis application. - Click on the Create button.
- Enable the web application by clicking on the Disable button.
Enable Redis extension for PHP scripts
After installing Redis in a web application, you need to enable support for Redis in the PHP configuration for your website. You can do this via the PHP settings section of your hosting Control Panel. Once there, open the PHP settings management page for your website by pressing the Manage button next to its subdomain, and select the "redis" extension. Press the Save button to save the PHP configuration.
Enable Redis caching in your scripts or website
The final step to use Redis on your website is to configure your scripts or software applications to connect to the Redis socket of your web application. If your username is example and you installed Redis in the /private/redis/ directory of your account, the Redis socket would be:
/home/example/private/redis/redis.sock
Details on how to enable Redis support for a particular script or a software application should be available in its official documentation. Otherwise, you should contact the developers and/or vendors of the script or software application that you use for assistance.
WordPress and Redis
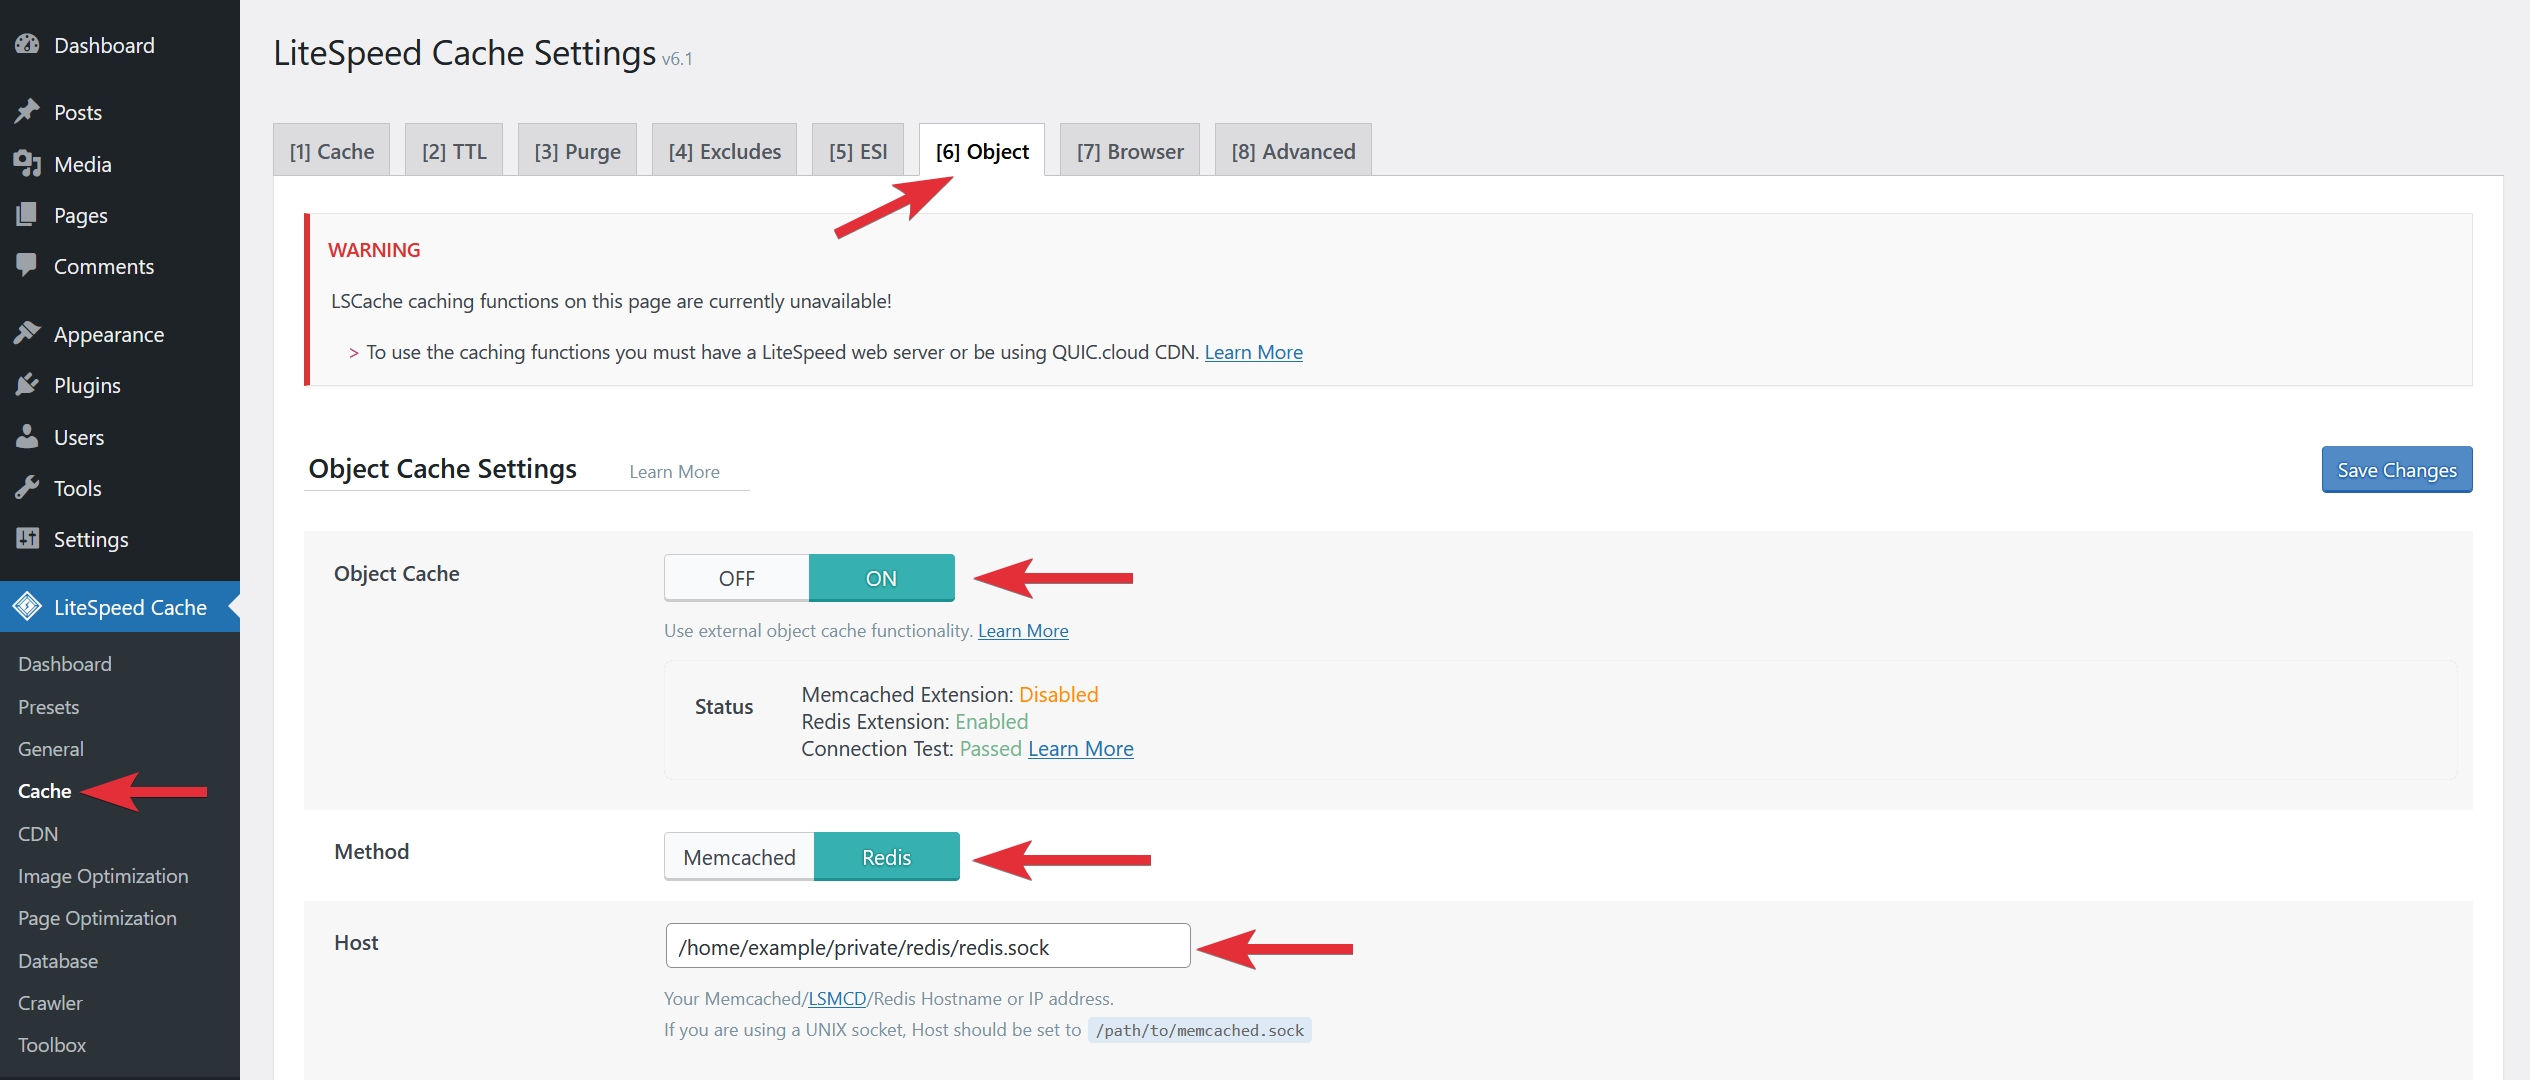
To use Redis on WordPress, you need to install a plugin that offers support for it. One such plugin is LiteSpeed Cache. After the plugin is installed on your WordPress website, you need to:
- Access the WordPress Dashboard as an administrator.
- Open the Cache section of the LiteSpeed Cache plugin.
- Navigate to the [6] Object tab.
- Enable the Object Cache.
- Enter the socket of your Redis installation (e.g. /home/example/private/redis/redis.sock).
- Save the changes with the Save Changes button.

After the settings are saved, the information under Status should indicate that the Redis extension is enabled and the connection test passed.
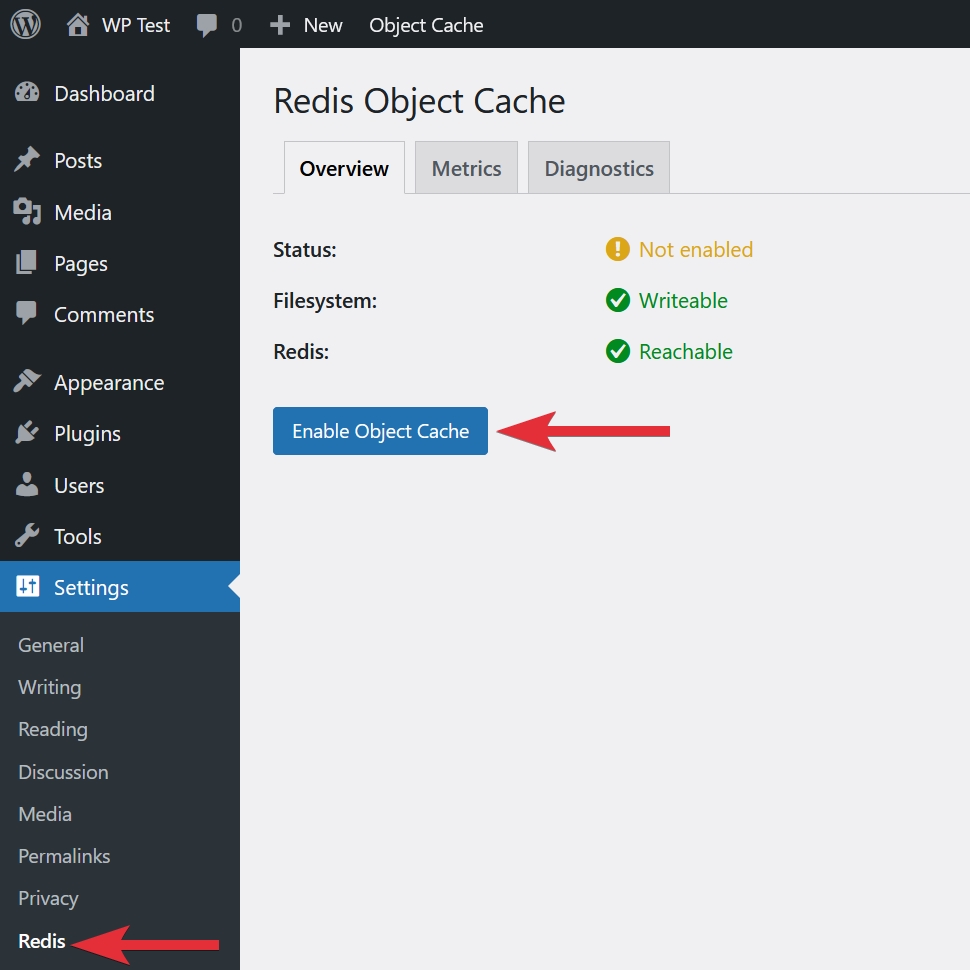
Another plugin that you can use is Redis Object Cache. To configure the plugin, you need to add the following lines to the wp-config.php file of your WordPress installation in order to set the Redis socket path of your web application (e.g. /home/example/private/redis/redis.sock):
define( 'WP_REDIS_SCHEME', 'unix' );
define( 'WP_REDIS_PATH', '/home/example/private/redis/redis.sock' );
After you save the changes in the WordPress configuration file, you should be able to enable the Redis caching in the plugin page within the WordPress Dashboard:
Joomla and Redis
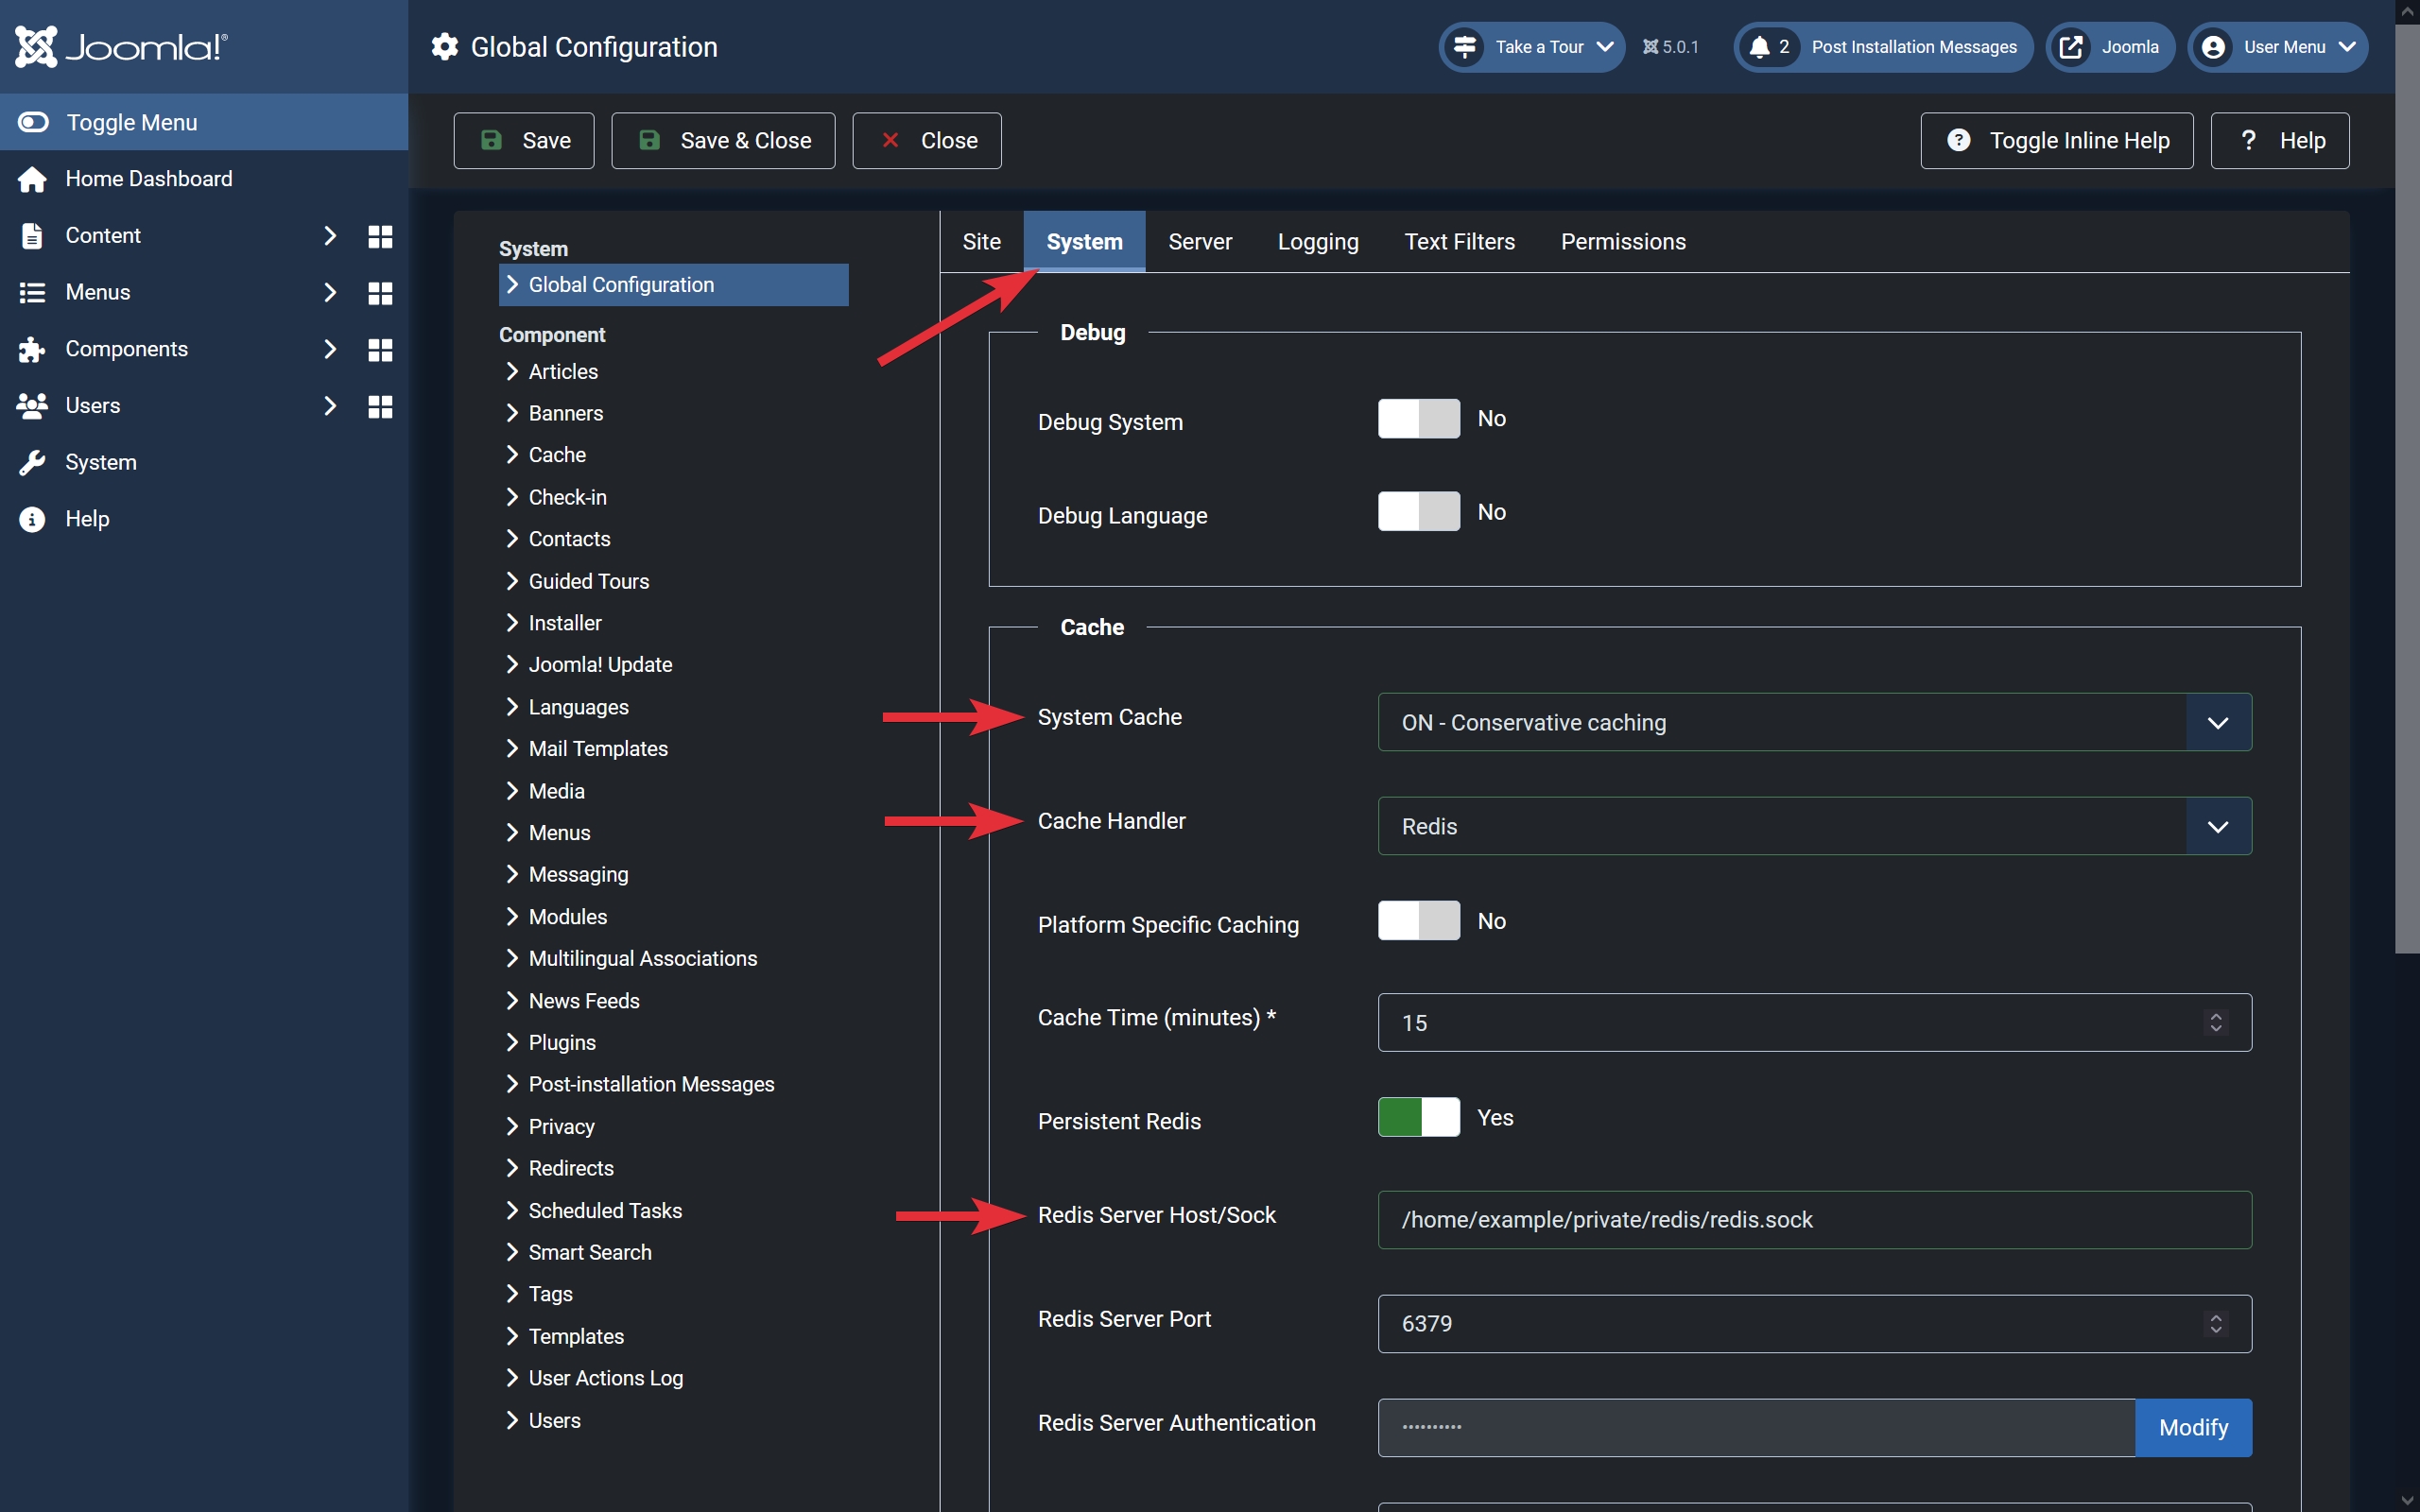
To enable support for Redis caching on Joomla version 5, follow these simple steps:
- Access the Joomla administration dashboard.
- Go to the Global Configuration page (System > Setup > Global Configuration).
- Navigate to the System tab.
- In the Cache section:
- Select ON - Conservative caching or ON - Progressive caching for System Cache.
- Choose Redis for Cache Handler.
- Enter the socket of your Redis installation (e.g. /home/example/private/redis/redis.sock) in the Redis Server Host/Sock field.
- Press the Save or Save & Close button to save the new settings.
